Difference between revisions of "RLV SMARTSTRIP FOLDERS"
(→Arrange outfits to work with Smart Strip) |
|||
| (7 intermediate revisions by the same user not shown) | |||
| Line 1: | Line 1: | ||
| − | + | __NOEDITSECTION__ | |
__NOTOC__ | __NOTOC__ | ||
| + | [[Category:OOC]] | ||
{| class="wikitable" border="6" style="width: 85%; text-align:center;" | {| class="wikitable" border="6" style="width: 85%; text-align:center;" | ||
|+<h1>FRACTURED RLV SETUP</h1> | |+<h1>FRACTURED RLV SETUP</h1> | ||
| Line 13: | Line 14: | ||
|- | |- | ||
|[[RLV_AUTOATTACH| AutoAttach]] | |[[RLV_AUTOATTACH| AutoAttach]] | ||
| − | | | + | | |
|[[Fractured_RLV| Quick Start]] | |[[Fractured_RLV| Quick Start]] | ||
| − | |||
| − | |||
| − | |||
| − | |||
|- | |- | ||
|} | |} | ||
| − | |||
==Smart Strip== | ==Smart Strip== | ||
Smart Strip solves the problem of clothing items not being actual clothing layers. | Smart Strip solves the problem of clothing items not being actual clothing layers. | ||
| Line 37: | Line 33: | ||
|- | |- | ||
| style="width: 40%"|Start with a default blank outfit in your RLV folder. | | style="width: 40%"|Start with a default blank outfit in your RLV folder. | ||
| − | | style="width: 40%"|[[File:rlvfolder4.png | + | | style="width: 40%"| [[File:rlvfolder4.png|250px|center|]] |
|- | |- | ||
|If you do not have one you can get it here: | |If you do not have one you can get it here: | ||
| Line 44: | Line 40: | ||
|Copy and rename it to something useful, like Outfit-1 | |Copy and rename it to something useful, like Outfit-1 | ||
* In each folder place the clothing layer, alpha layer and all attachments. For instance, "boots" might include a shoe base, ankle attachments, and alpha. | * In each folder place the clothing layer, alpha layer and all attachments. For instance, "boots" might include a shoe base, ankle attachments, and alpha. | ||
| − | * If the outfit subfolder already provides a system clothing layer, | + | * If the outfit subfolder already provides a system clothing layer, remove the dummy 'non-clothing' system clothing layer from the folder. |
| + | * Only use the provided 'non-clothing' when not provided by the original outfit. For instance, a "shirt" subfolder might only contain a mesh shirt and an alpha. So place a dummy shirt layer there. When worn with the other contents of the folder, it will not be visible on your avatar but will target the shirt for smart strip in the Remove Clothing menu. | ||
* Which should leave you something like this. | * Which should leave you something like this. | ||
| − | |[[File:smartstrip1.png|250px|center]] | + | | [[File:smartstrip1.png|250px|center]] |
|- | |- | ||
| | | | ||
| Line 59: | Line 56: | ||
|} | |} | ||
| − | |||
| − | |||
| − | |||
| − | |||
| − | |||
| − | |||
*NOTE avoid placing multiple copies of the same dummy layer in a single outfit, since sl will not allow you to wear two copies of an identical item. | *NOTE avoid placing multiple copies of the same dummy layer in a single outfit, since sl will not allow you to wear two copies of an identical item. | ||
*NOTE* Smart Strip can work with linked items, only if the links are to an original copy that is also in #RLV shared folders. Remember that the strip function by itself does not use folders, it identifies the actual worn item. But smart strip requires that item to be in an RLV folder for the next operation, which is "detach with this everything in the same folder". Therefore, the target of the link, the original worn item, must be in an RLV folder, and that folder must already be organized into groups that will be stripped with the item, since that is the folder the command will "see" when it strips the clothing layer. Too confusing? don't use links then. | *NOTE* Smart Strip can work with linked items, only if the links are to an original copy that is also in #RLV shared folders. Remember that the strip function by itself does not use folders, it identifies the actual worn item. But smart strip requires that item to be in an RLV folder for the next operation, which is "detach with this everything in the same folder". Therefore, the target of the link, the original worn item, must be in an RLV folder, and that folder must already be organized into groups that will be stripped with the item, since that is the folder the command will "see" when it strips the clothing layer. Too confusing? don't use links then. | ||
| − | Once the #RLV folder is built, a user can just browse the menu and select particular objects and outfits to wear or remove. | + | *Once the #RLV folder is built, a user can just browse the menu and select particular objects and outfits to wear or remove. |
| − | NOTE: If you place a + sign at the start of a folder name in your inventory, this also means "add"--it will add when the command issued RLV, is actually "wear". | + | *NOTE: If you place a + sign at the start of a folder name in your inventory, this also means "add"--it will add when the command issued RLV, is actually "wear". |
| − | .Hidden folders | + | ===.Hidden folders=== |
Any folder with a dot in front of the name will not appear in the collar menu, nor will any of its subfolders. For instance, keep a folder named [.hidden] in your RLV folders. Use it when sorting outfits you don't want to show in the collar menu. | Any folder with a dot in front of the name will not appear in the collar menu, nor will any of its subfolders. For instance, keep a folder named [.hidden] in your RLV folders. Use it when sorting outfits you don't want to show in the collar menu. | ||
Do not place a dot in front of a subfolder that contains items to be worn; when you issue an rlv command to wear the outfit, the subfolders will not be found. For Firestorm and other viewers with RLVa, only a chat command with that exact folder name will still find a hidden folder. | Do not place a dot in front of a subfolder that contains items to be worn; when you issue an rlv command to wear the outfit, the subfolders will not be found. For Firestorm and other viewers with RLVa, only a chat command with that exact folder name will still find a hidden folder. | ||
| − | (nostrip) | + | ===(nostrip)=== |
Add (nostrip) to the end of any item or folder containing an item that you do not ever want stripped by rlv. For instance, a folder contains a hair named blondie. If the folder is named blondie (nostrip) it cannot be stripped. Or if the hair item can be named blondie (nostrip) it cannot be stripped. This does not work for subfolders if only the top folder has (nostrip) at the end of the name. | Add (nostrip) to the end of any item or folder containing an item that you do not ever want stripped by rlv. For instance, a folder contains a hair named blondie. If the folder is named blondie (nostrip) it cannot be stripped. Or if the hair item can be named blondie (nostrip) it cannot be stripped. This does not work for subfolders if only the top folder has (nostrip) at the end of the name. | ||
| − | |||
| − | |||
| − | |||
| − | |||
| − | |||
| − | |||
| − | |||
| − | |||
For more on shared folders see Marine Kelley's tutorial at http://realrestraint.blogspot.com/2008/08/objects-sharing-tutorial.html. | For more on shared folders see Marine Kelley's tutorial at http://realrestraint.blogspot.com/2008/08/objects-sharing-tutorial.html. | ||
Latest revision as of 08:22, 6 March 2019
| Basic Viewer Setup | Basic Folder Setup | Basic Relay Setup |
| About RLV | SmartStrip Folders | SmartStrip Relay Setup |
| AutoAttach | Quick Start |
Smart Strip
Smart Strip solves the problem of clothing items not being actual clothing layers.
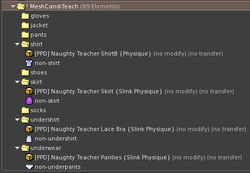
- For instance, "boots" might include a shoe base, ankle attachments, and alpha.
- Or in the case of Mesh Avatars, where none of your clothes are actual clothing layers.
It provides a method to use 'fake clothing' to build folders of items to be attached and removed.
Setting Up Smart Strip
Arrange outfits to work with Smart Strip
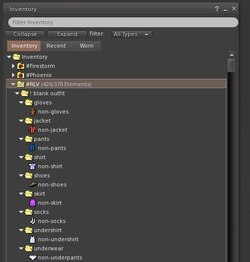
| Start with a default blank outfit in your RLV folder. | |
| If you do not have one you can get it here: | |
Copy and rename it to something useful, like Outfit-1
|
|
- NOTE avoid placing multiple copies of the same dummy layer in a single outfit, since sl will not allow you to wear two copies of an identical item.
- NOTE* Smart Strip can work with linked items, only if the links are to an original copy that is also in #RLV shared folders. Remember that the strip function by itself does not use folders, it identifies the actual worn item. But smart strip requires that item to be in an RLV folder for the next operation, which is "detach with this everything in the same folder". Therefore, the target of the link, the original worn item, must be in an RLV folder, and that folder must already be organized into groups that will be stripped with the item, since that is the folder the command will "see" when it strips the clothing layer. Too confusing? don't use links then.
- Once the #RLV folder is built, a user can just browse the menu and select particular objects and outfits to wear or remove.
- NOTE: If you place a + sign at the start of a folder name in your inventory, this also means "add"--it will add when the command issued RLV, is actually "wear".
.Hidden folders
Any folder with a dot in front of the name will not appear in the collar menu, nor will any of its subfolders. For instance, keep a folder named [.hidden] in your RLV folders. Use it when sorting outfits you don't want to show in the collar menu.
Do not place a dot in front of a subfolder that contains items to be worn; when you issue an rlv command to wear the outfit, the subfolders will not be found. For Firestorm and other viewers with RLVa, only a chat command with that exact folder name will still find a hidden folder.
(nostrip)
Add (nostrip) to the end of any item or folder containing an item that you do not ever want stripped by rlv. For instance, a folder contains a hair named blondie. If the folder is named blondie (nostrip) it cannot be stripped. Or if the hair item can be named blondie (nostrip) it cannot be stripped. This does not work for subfolders if only the top folder has (nostrip) at the end of the name.
For more on shared folders see Marine Kelley's tutorial at http://realrestraint.blogspot.com/2008/08/objects-sharing-tutorial.html.

