Difference between revisions of "RLV BASIC FOLDER SETUP"
From Fractured Reality
| (11 intermediate revisions by the same user not shown) | |||
| Line 1: | Line 1: | ||
__NOEDITSECTION__ | __NOEDITSECTION__ | ||
__NOTOC__ | __NOTOC__ | ||
| + | [[Category:OOC]] | ||
{| class="wikitable" border="6" style="width: 85%; text-align:center;" | {| class="wikitable" border="6" style="width: 85%; text-align:center;" | ||
|+<h1>FRACTURED RLV SETUP</h1> | |+<h1>FRACTURED RLV SETUP</h1> | ||
| Line 13: | Line 14: | ||
|- | |- | ||
|[[RLV_AUTOATTACH| AutoAttach]] | |[[RLV_AUTOATTACH| AutoAttach]] | ||
| − | | | + | | |
|[[Fractured_RLV| Quick Start]] | |[[Fractured_RLV| Quick Start]] | ||
| − | |||
| − | |||
| − | |||
| − | |||
|- | |- | ||
|} | |} | ||
| + | *For a standard Avatar, with one outfit, these instructions should get you going. | ||
| + | *For mesh Avatars, with multiple outfits, Huds, and Attachments, after completing the basic setup steps, you should continue with SmartStrip and AutoAttach setup. | ||
{| | {| | ||
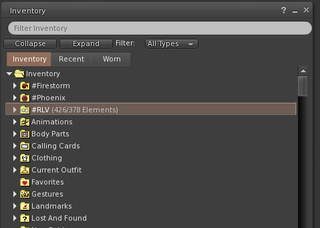
| − | |+ | + | |+Basic Folder Setup |
|[[File:rlvfolder3.png|320px|]] | |[[File:rlvfolder3.png|320px|]] | ||
| | | | ||
| − | + | * Make a main folder in your inventory, not inside another folder. | |
| − | + | * Name it #RLV -- those four characters exactly (Yes, 'exactly'! It is case sensitive.). | |
| − | | | + | |- |
| − | |||
| − | |||
| | | | ||
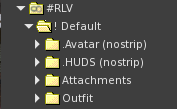
| − | + | * Select the #RLV folder and click "Create" -> "New Folder". Name this new folder !Default. The ! makes this folder appear at the top of the list. | |
| − | + | * Inside this folder create Four new folders, one each for your default Avatar, HUDS, Outfit, and attachments. As shown | |
| − | |||
| − | |||
|[[File:rlv_default1.png|320px|]] | |[[File:rlv_default1.png|320px|]] | ||
| + | |- | ||
| + | |[[File:rlv_default2.png|320px|]] | ||
| + | | | ||
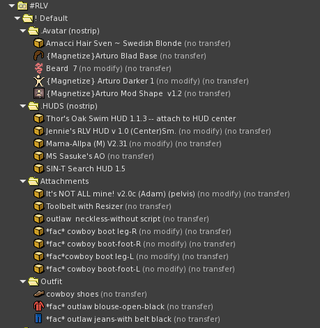
| + | * Drag or copy everything you would normally wear into these four folders and wear them. This will rename the objects (things that are not strictly clothes, like prim skirts and hair, and huds) to include their attachment point. | ||
|} | |} | ||
| − | + | * wear the RLV Relay that you got with these instructions. ((Satomi's Multi-Relay HUD)) | |
| − | |||
| − | |||
| − | |||
| − | |||
| − | |||
| − | |||
| + | * Log off and log back on. | ||
| + | For more information on setting up folders visit http://wiki.secondlife.com/wiki/LSL_Protocol/RestrainedLifeAPI#Shared_Folders | ||
[[Category:FRACTURED_FEATURES]] | [[Category:FRACTURED_FEATURES]] | ||
Latest revision as of 08:20, 6 March 2019
| Basic Viewer Setup | Basic Folder Setup | Basic Relay Setup |
| About RLV | SmartStrip Folders | SmartStrip Relay Setup |
| AutoAttach | Quick Start |
- For a standard Avatar, with one outfit, these instructions should get you going.
- For mesh Avatars, with multiple outfits, Huds, and Attachments, after completing the basic setup steps, you should continue with SmartStrip and AutoAttach setup.
- wear the RLV Relay that you got with these instructions. ((Satomi's Multi-Relay HUD))
- Log off and log back on.
For more information on setting up folders visit http://wiki.secondlife.com/wiki/LSL_Protocol/RestrainedLifeAPI#Shared_Folders


